Automágica: durante 2017 estoy trabajando bastante en Automágica, mi software para editar libros: Más información - Posts relacionados

argparse - Command line option and argument parsing

Hoy recibí la última edición de Python Module of the Week, un semanal de Doug Hellmann sobre módulos de Python. Leo:

The argparse module was added to Python 2.7 as a replacement

for optparse.

Nunca había usando optparse hasta hace un par de meses y estaba contento de haberlo empezado a usar, ordenaba mis programas de línea de comando con bonitos parámetros. ¿Tengo que aprender otro sistema totalmente nuevo? Veamos.

Esta es una parte de mi programa original:

from optparse import OptionParser

parser = OptionParser(usage="rpcping ip [-p port] [-r rep] [-s size]", version="rpcping 1.0")


parser.add_option("-p", type="int", dest="port", default=PORT)

parser.add_option("-r", type="int", dest="rep", default=REP)

parser.add_option("-s", type="int", dest="size", default=SIZE)

(options, args) = parser.parse_args()


if not args:

    parser.error("se necesita la direccion ip del servidor como argumento posicional.")

else:

    ip = args[0]


if not 1024 < options.port < 65535:

    parser.error("el puerto debe ser mayor a 1024 y menor a 65535.")

else:

    port = options.port


if not 0 < options.rep < 101:

    parser.error("las repeticiones deben ser mayores a 0 y menores a 101.")

else:

    rep = options.rep


if not 0 < options.size < 10001:

    parser.error("el tamaño deben ser mayores a 0 y menores a 10001.")

else:

    size = options.size

Qué tuve que cambiar para que funcione con argparse:

  • Cambiar nombres; optparse por argparse, OptionParser por ArgumentParser, add_option por add_argument.
  • Cambiar el valor del agumento type de string a un tipo de verdad. En mi caso type="int" por type=int.
  • Si tratamos de obtener el resultado del parsing así (options, args) = parser.parse_args(), vamos a tener un error TypeError: 'Namespace' object is not iterable. El nombre result en el nuevo código está asociado a un objeto del tipo Namespace.
  • optparse no trabaja con argumentos obligatorios, por lo que para el argumento ip había tenido que escribir código extra por mi cuenta. En argparse es más simple.

El resultado es:

from argparse import ArgumentParser

parser = ArgumentParser(description="Realiza ping via RPC contra un servidor", version="rpcping 1.0")


parser.add_argument("ip")

parser.add_argument("-p", type=int, dest="port", default=PORT)

parser.add_argument("-r", type=int, dest="rep", default=REP)

parser.add_argument("-s", type=int, dest="size", default=SIZE)

result = parser.parse_args()


ip = result.ip


if not 1024 < result.port < 65535:

    parser.error("el puerto debe ser mayor a 1024 y menor a 65535.")

else:

    port = result.port


if not 0 < result.rep < 101:

    result.error("las repeticiones deben ser mayores a 0 y menores a 101.")

else:

    rep = result.rep


if not 0 < result.size < 10001:

    parser.error("el tamaño deben ser mayores a 0 y menores a 10001.")

else:

    size = result.size

Parece que con poco esfuerzo se puede migrar de optparse a argparse y luego empezar a estudiar las nuevas funcionalidades que incorpora.

The implementation of argparse supports features that would not have been easy to add to optparse, and that would have required backwards-incompatible API changes, so a new module was brought into the library instead. optparse is still supported, but is not likely to receive new features.

Más en: PyMOTW: argparse - Command line option and argument parsing.


functools.update_wrapper

Este post se alinea con la serie Decoradores en Python (I, II, III) pero no es tan elaborado como para ser Decoradores en Python (IV) :)

Desde Python 2.5, al crear un decorador, se puede utilizar functools.update_wrapper para quela versión decorada de la función, tenga los atributos name, doc, module y dict de la función original.

>>> import functools

>>> def deco(f):

... def inner(a, *kw):

... print "Este decorador no hace nada"

... return f(a, *kw)

... return inner

...

>>> def saludo():

... print "hola"

...

>>> saludo2 = deco(saludo)

>>> saludo2()

Este decorador no hace nada

hola

>>> saludo2.name

'inner'

>>> def deco(f):

... def inner(a, *kw):

... print "Este decorador no hace nada"

... return f(a, *kw)

... return functools.update_wrapper(inner, f)

...

>>> saludo3 = deco(saludo)

>>> saludo3()

Este decorador no hace nada

hola

>>> saludo3.name

'saludo'

>>> saludo = saludo3


Puedo disfrazar cualquier cosa de Modbus

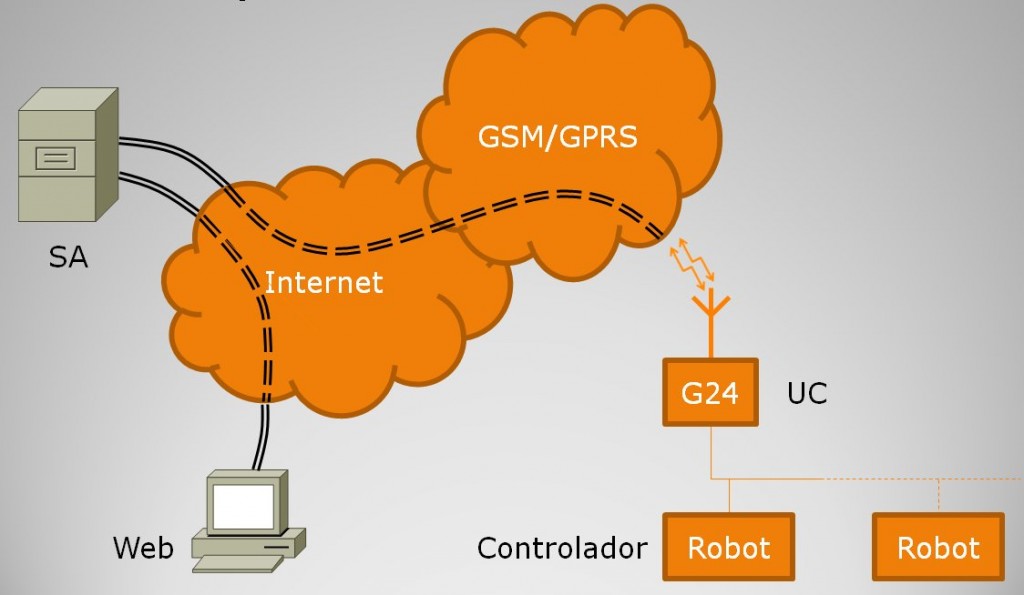
Hace más de un año participo en un proyecto de desarrollo de un sistema SCADA, específicamente en la capa de comunicación. La distribución física es algo como esto:

En cada edificio hay una red 485 con dispositivos de hardware propio (aka Robot) y un módulo celular (Motorolla G24) con salida a Internet vía GPRS. Esos módulos se registran en un servidor (escrito con Twisted) para ser luego sondeados: se registran sus mediciones, hay gráficos en tiempo real, se puede hacer telecomando y encender un equipo a la distancia o cambiar un set point; entre otras cosas.

Nuestra primera implementación estaba inspirada en el protocolo Modbus ASCII, pero bastante alejada del estándar. Nos sirvió por bastante tiempo y no apegarnos a una especificación nos permitió acelerar el desarrollo; especialmente del hardware.

Modbus es un protocolo de línea maestro/esclavo en donde el maestro realiza peticiones de lectura o escritura sobre algún o algunos registros en un esclavo. El protocolo define 4 tipos de registros (analógicos o digitales, de solo lectura o lectura-escritura) y fue pensado para funcionar sobre una línea serie; existen dos sabores: RTU, dónde los datos viajan en forma binaria y la ocupación del canal es optimizada y ASCII, menos eficiente pero legible por humanos. Se puedo leer más al respecto en Wikipedia o en la página oficial del protocolo.

Hace algunos meses empezamos a utilizar Mango m2m. Mango tiene todos los componentes de interfaz de usuario que se pueden necesitar en un SCADA en adición a la posibilidad de conectarle distintas fuentes de datos (desde Modbus Serie a un motor de base de datos); las más interesante para nosotros es Modbus TCP.

Modbus TCP extiende el protocolo original para poder utilizarlo sobre la red de redes en lugar de sobre una línea serie. Por ejemplo, una de las cosas que hace es agregar al paquete enviado un número consecutivo para solucionar el problema de paquetes perdidos o duplicados.

Teníamos entonces, por un lado Mango que sabe hablar Modbus TCP y por el otro los robotitos hablando un dialecto de Modbus ASCII. En el medio, el servidor de comunicaciones. La pregunta en este punto era cómo unir ambos extremos, de manera de aprovechar esta herramienta que soluciona muchos de nuestros requerimientos.

Allí es donde entra en acción pymodbus, una implementación en Python del stack Modbus. No solo está escrita en Python, sino que está implementada utilizando el framework Twisted, el mismo que venía usando para el servidor de comunicaciones. Utilizando pymodbus pude engañar a Mango y hacerle creer que hablaba contar dispositivos Modbus TCP cuando en realidad interceptaba sus peticiones, enviaba los comandos necesarios a los robots y contestaba con la respuesta correcta.

En el camino encontré varios problemas en la librería, los fui reportando y enviando parches para solucionarlos. A lo último eran tanto los cambios que enviaba y empecé a modificar el core de la librería para que funcione con deferrers (es decir, siguiendo la filosofía de Twisted) que recibí permiso de commit en la rama devel.

Nota: el esquema descripto funcionó bastante tiempo. Actualmente seguimos avanzando y los robots ya hablan Modbus ASCII estándar a la vez que el componente intermedio adelgazó para convertirse en un traductor o gateway.


Diccionario bidireccional en Python

Bidirectional dict o Injective mapping es una estructura de datos muy útil.

Por lo general cuando usamos un diccionario o tabla hash, tenemos un valor asociado a una clave:

>>> d = {1:'uno', 2:'dos'}

>>> d[1]

'uno'

Pero algunas veces también resulta útil indexar por el valor y obtener la clave.

>>> d['uno']

1

Por ejemplo, en un programa tengo un archivo de configuración que contiene un diccionario dónde las claves son strings de 3 caracteres representando un edificio ('SFE', 'GDP', ...) y las claves números de puerto (5007, 5008, ...). En algunas partes el programa requiere conocer el edificio a partir del número de puerto y en otras el puerto a partir del edificio.

¿Cómo obtenemos este comportamiento?

Pregunté en StackOverflow y si bien me apuntaron a una implementación, la solución que más me gustó fue esta:

>>> d.update( dict((d[k], k) for k in d))

Así se ve d ahora:

{1: 'uno', 2: 'dos', 'uno': 1, 'dos': 2}

Y podemos efectivamente indexar por clave o por valor:

>>> d[1]

'uno'

>>> d['uno']

1

Advertencias

No se pueden usar objetos mutables

En los diccionarios de Python solo objetos inmutables pueden ser clave de diccionarios, por lo tanto, en nuestro diccionario bidireccional, tanto las claves como los valores deberán serlo.

Actualizaciones

Otra limitación de este enfoque son las desincronizaciones que puede sufrir al modificar el bidict luego de realizar la transformación; hay que tener cuidado!

  • Luego de agregar un nuevo elemento debemos volver a ejecutar la línea mágica para que cree la entrada inversa.
  • No podemos agregar un par que tenga como clave algo que ya existía como valor o que tenga como valor algo que ya existía como clave.
  • Si borramos una entrada, hay que también borrar su inversa.

Conclusión personal

Como les contaba antes, yo estaba usando el diccionario original en un archivo de configuración, por lo que no toco la estructura de datos durante la ejecución del programa, así que esta solución compacta y elegante... como dijo el filósofo: me viene al pelo!

Espero a alguien más le sirva.


Pilas y colas en Python

La forma más directa de tener pilas y colas en Python es usando listas, una de las poderosas estructuras de datos que vienen con el lenguaje.

Una pila es una estructura de datos secuencial en la que el último elemento insertado es el primero en retirarse (LIFO) y puede implementarse directamente con los métodos append y pop.

Una operación común en las pilas es top, que devuelve el elemento en el tope de la pila, pero sin quitarlo; esta operación se puede emular indexando por -1.

>>> pila = [6,7,8]

>>> pila.append(9)

>>> pila

[6, 7, 8, 9]

>>> pila.pop()

9

>>> pila.pop()

8

>>> pila[-1]

7

Implementar una cola requiere algo más. En las colas, a diferencia de las pilas, el primer valor insertado es el primero en quitarse (FIFO).

Un primer intento es implementarla con append y pop(0) que obtiene el primer elemento (o con insert insertando al principio y pop). Pero las listas de Python, si bien están optimizadas para insertar al final y quitar del final, no lo están para insertar al principio o quitar del principio. La solución es utilizar collections.deque que si está implementada con estas operaciones optimizadas.

>>> from collections import deque

>>> cola = deque([1,2,3])

>>> cola.append(4)

>>> cola

deque([1, 2, 3, 4])

>>> cola.popleft()

1

>>> cola.popleft()

2

>>> cola

deque([3, 4])


Talk: Taint Mode for Python via a Library (slides)

These are my slides for the presentation Taint Mode for Python via a Library I gave in OWASP App Sec 2010 in Stockholm last 24th of June. The organizers will be publishing some media (photos and video) from the talk.

This presentation is called A Taint Mode for Python via a Library and is a joint work of me, Juan José Conti and Alejandro Russo.

img0

Today most of the computer attacks are produced against web applications rather than to desktop applications (which requires knowledge of an specific domain) or to the operating system (which requires low level knowledge).

Attack web sites is much more easier.

The consequences of these kind of attacks can vary, for example:

Impersonate: when an attacker stills the identity of a user in in web site.

Compromise confidential data: when an unauthorized user reaches data he wasn't suppose to reach.

Denial of Service: when a resource is not available to its genuine users.

And

Data destruction.

So the attacker goal is to craft input data to gain some control over certain operations. It's important to mention here that the attacker has no control over the executed code, just over the input data.

img1

These are examples of different sensitive sinks an attacker could attack.

The attacker can manipulate the data that will be use to produce an SQL query and obtain some secret information.

…make an operating system injection and execute arbitrary commands on it

or

.... exploit an XSS vulnerability and stole a user's credentials in some web site.

img2

A way to face these problems is using Taint Analysis. Usually enforcesd

Data received from a client is considerer tainted. We can't trust in data from the outside because we don't know who generate it. May be a real user, maybe an attacker or even an attacker program.

Tainted data can be untainted by a sanitization process.

We don't want tainted data to reach sensitive sinks.

In the image you can see different sanitization processes represented with different colors. This means that data that will finish in different sinks needs to be properly cleaned for that kind of sink.

It's not the same the function you'll use to protect a page renderer against XSS than the DB against SQLI.

img3

For example, look a this chunk of data. If it's used in the where clause of an SQL query and that query says something like: delete all rows from table X where id equals to VALUE, then all the rows will be deleted. But if the VALUE is used to generate a web page, it's harmless.

Something similar happens with this code. If it's used as is it to render a web page, a message will pop-up and we'll have in front of our eyes an XSS vulnerability. Again, if the chunk of data finish in a logging process on the operating systems, it would be harmless.

img4

Taint analysis can be performed in two ways. Dynamic or static.

Dynamic analysis is usually implemented as a Monitor and have the advantage to produce less false alarms that static analysis. Its main drawbacks are the overhead produced (because the program and the monitors runs at the same time) and the need to modify the interpreter in order the achieve the desire behavior.

On the other hand, static analysis produce no overhead because it analyze the text of the program without need to run it and no modification of the interpreter is needed. A mayor disadvantage is that they usually generate more false alarms than Monitors.

Our approach is a library written in Python where no interpreter modification is needed, so we solve one of the monitors drawbacks.

img5

In order to implement Taint Analysis, several tasks need to be performed.

We need a way to identify untrusted inputs, sanitization functions and sensitive sinks. They can be marked in the source code using some syntax or described in a configuration file.

Data must be untainted after a sanitization process.

Detect when tainted data reaches sensitive sinks

And the hardest one, propagate taint information on the program

img6

I'll show you an example of what I mean with taint propagation.

Suppose a is tainted because we receive it from the outside and b is clean because it was generated inside the program. Then, a concatenated with b need to be tainted too.

We also want taint propagation to take place when we do: a eight times, get an slice of a, use a for string formatting or apply to a any of its methods.

With all these concepts in mind, we can now see the implementation details of our library.

img7

We wrap python built-in types for 2 reasons: 1) in order to add a taints attribute which contains the tags identifying the taints an object has in certain moment.

And 2) to overload its methods in order to make them work in this way: if any of the method arguments is tainted or the object that receive the message is tainted, then the resulting object should be tainted too.

It's important to mention that our implementation support tainting of different types, while other only works with strings and that we provide tags to identify different kind of taints while other only use a boolean tag: tainted or not tainted.

In addition, to improve the taint propagation mechanism we also provide taint aware functions to replace some Python built-in functions. For example, len, which applied to a string, returns its length. If the original string is tainted, the resulting integer will be tainted too.

img8

We use decorators to mark untrusted sources, sensitive sinks and sanitization functions. Decorators are a Python abstraction that let us add certain behavior to functions, methods or classes.

For example, untrusted is the decorator used to mark a function as an untrusted source. We can apply it using a regular function call or, if we have access to the definition of the function we want to decorate, using Python's syntactic sugar for this.

The behavior added by this decorator is: mark every object returned by the function as tainted; and tainted with all the possible tags. Because we don't know which kind of attack could be hidden behind it.

img9

The second kind of decorator provided let the programmer specify which elements of his programs are considerer sensitive sinks. A difference with the previous one is that here we need to explicitly say which kind of attack the sink is sensitive to. We do it providing a parameter to the decorator. In the first example, an appropriate one would be SQLI.

img10

The third kind of element we need to mark are the sanitization functions. Again, we need to specify which kind of taint they are able to clean.

These are the principal decorators but others are provided as variations of the ones presented here.

img11

Now, we'll see a little demo of a web application.

note: the example shown can be downloaded from http://svn.juanjoconti.com.ar/dyntaint/trunk/webdemo/

img12

Finally, the main conclusion of this work is that it's possible to provide a lightweight taint analysis library for python with NO interpreter modification needed.

Future works could address us to make similar implementations in other languages and evaluate it in popular web applications; in order to achieve this, the library must be integrated with some web frameworks or in a platform like Google App Engine.

img13

More information on the library can be found in the presented paper. It can be downloaded from the author's web sites.

img14


8 de mayo: Python Day en Rafaela

El próximo sábado se va a desarrollar en la ciudad de Rafaela un Python Day, un día de charlas para que quienes no conozcan Python puedan acercarse al lenguaje. Vamos a tener muchas charlas introductorias y esperamos pueda aprovechar este evento tanto la comunidad universitaria como la ciudad en general.

http://www.pyday.com.ar/rafaela2010/

Por mi parte voy a estar colaborando con una charla nueva: Entendiendo Decoradores en Python. Esperemos salga bien :)

El Python Day es un evento organizado por PyAr con el apoyo de la Universidad Católica de Santiago del Estero, Departamento Académico Rafaela. El evento dura un día donde se darán pequeños cursos y charlas relacionadas a este lenguaje que de a poco va a haciendo su lugar entre los desarrolladores. Tenemos como intención hacer un espacio en donde cualquier persona interesada pueda acercarse para preguntar, aprender y experimentar con estas herramientas. El evento se llevará a cabo acá a partir de las 9:00 de la mañana. ¿Qué es Python? Python es un lenguaje de programación interpretado creado por Guido van Rossum en el año 1990. En la actualidad Python se desarrolla como un proyecto de código abierto, administrado por la Python Software Foundation. La última versión estable del lenguaje es la 2.6 (01 de octubre de 2008). Fuente: Wikipedia Quiero participar… ¿Qué Hago? Si lo que querés es asistir a las charlas, solo aparecete por la universidad el 8 de mayo a partir de las 09:00 y listo (por favor, si es posible, registrate previamente por web)